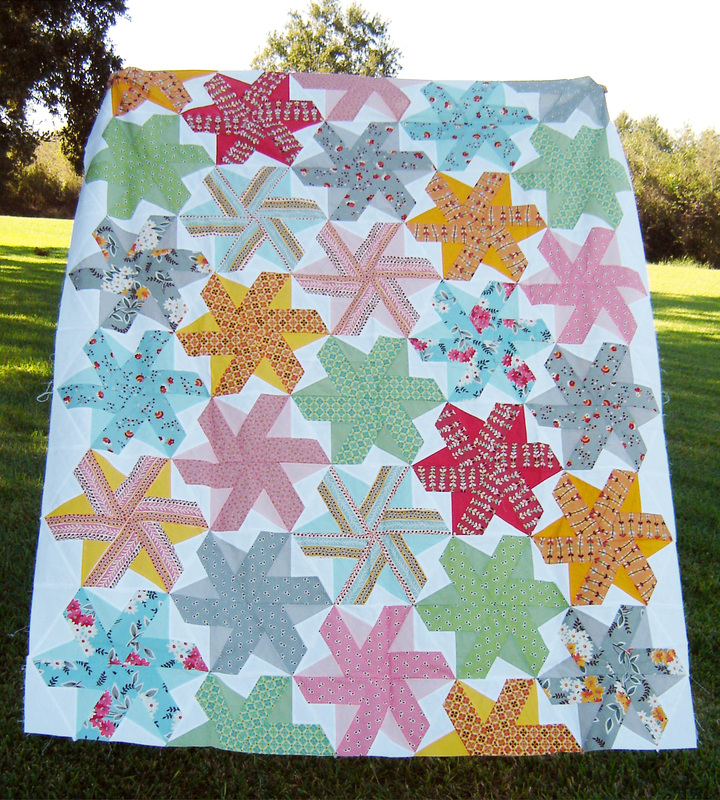
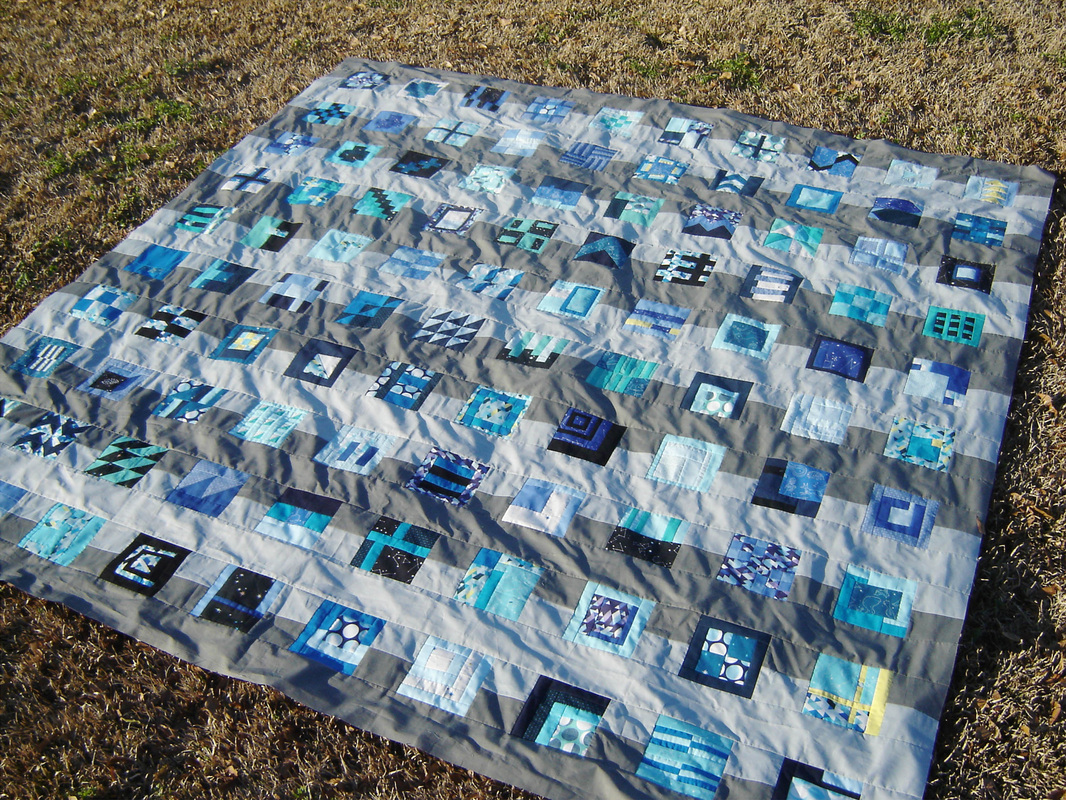
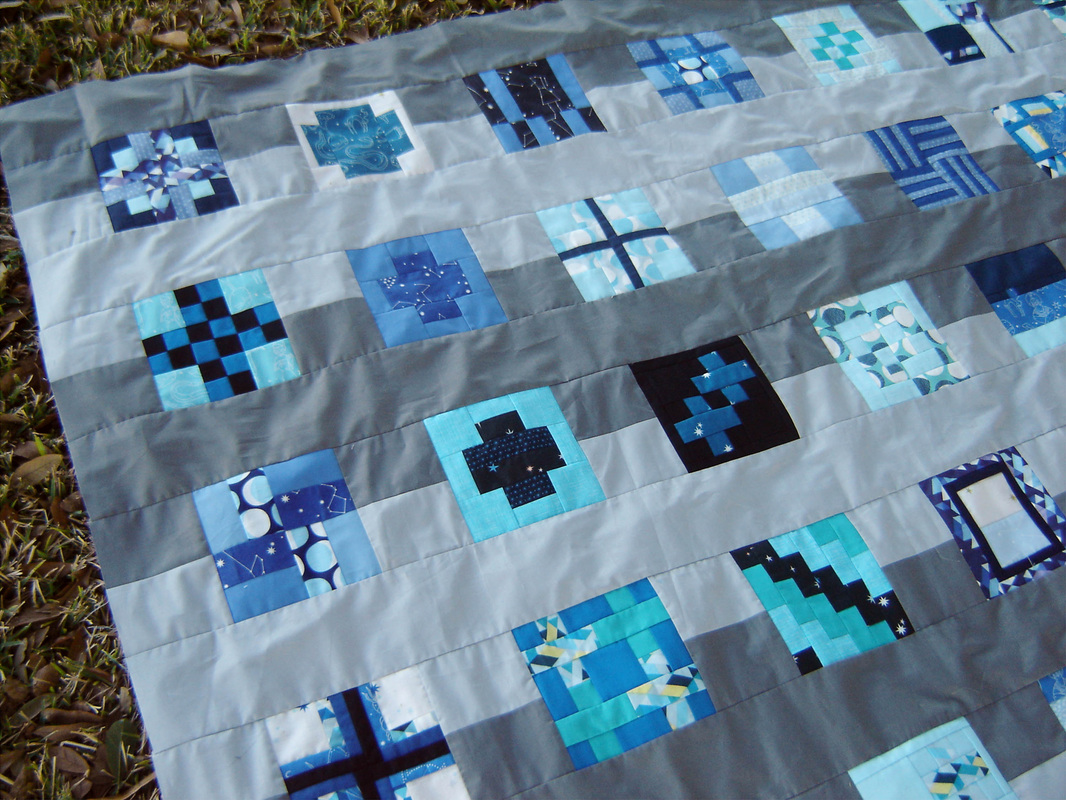
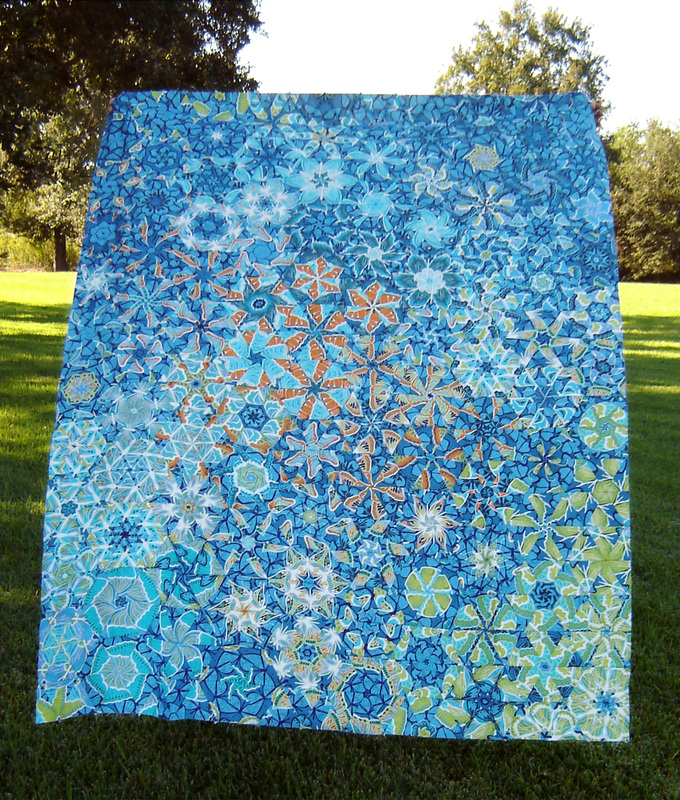
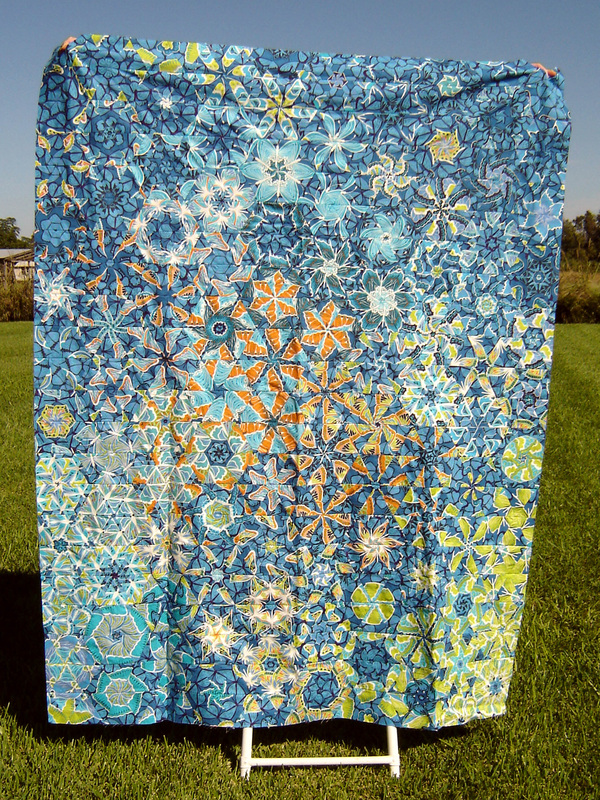
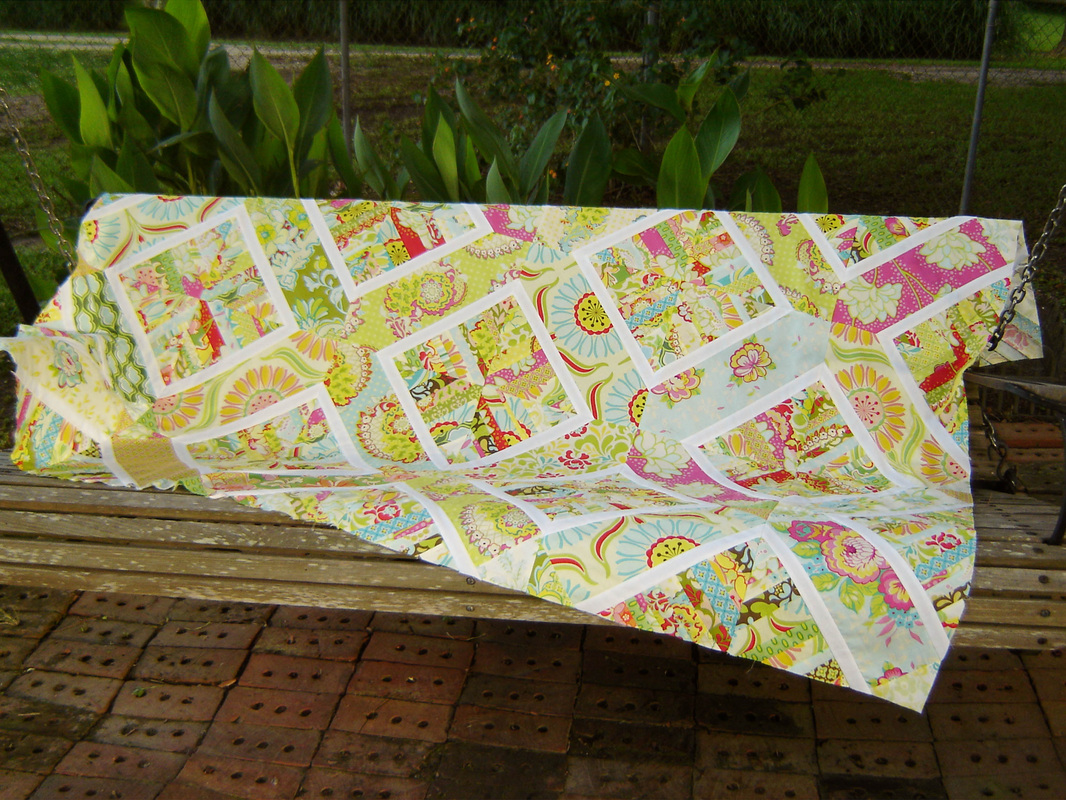
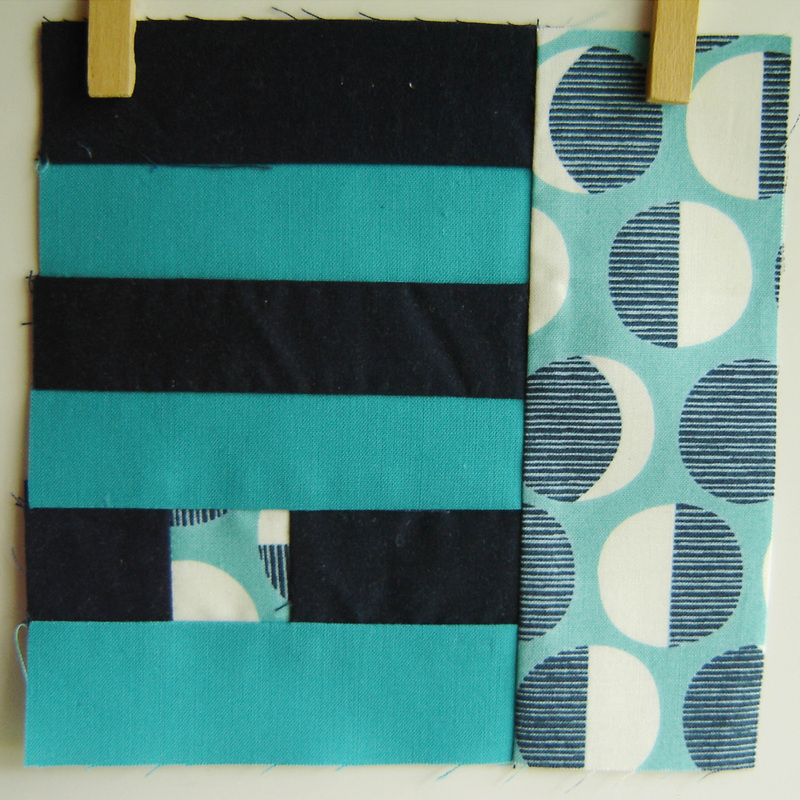
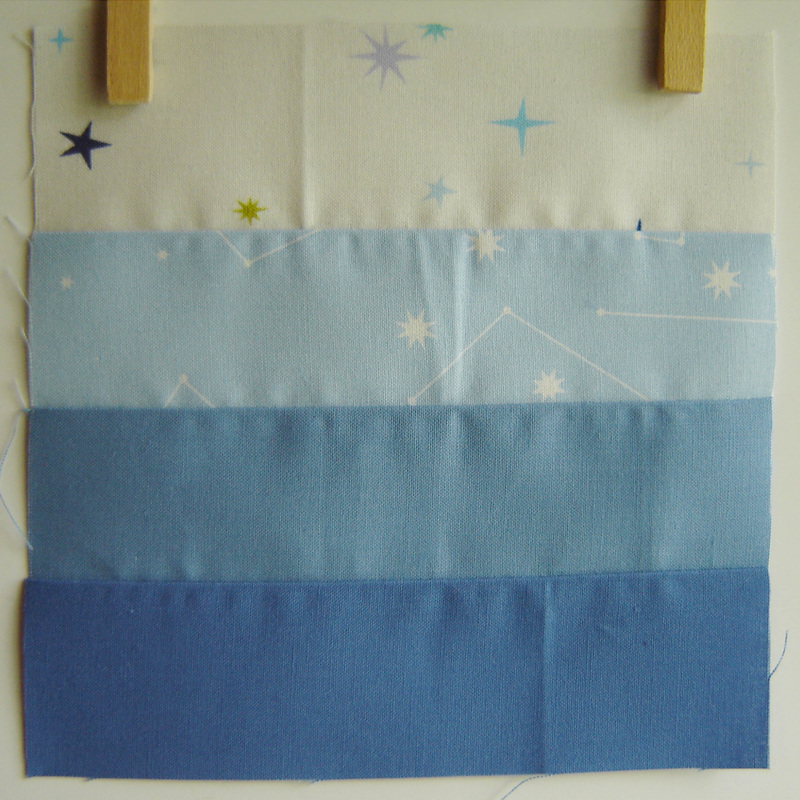
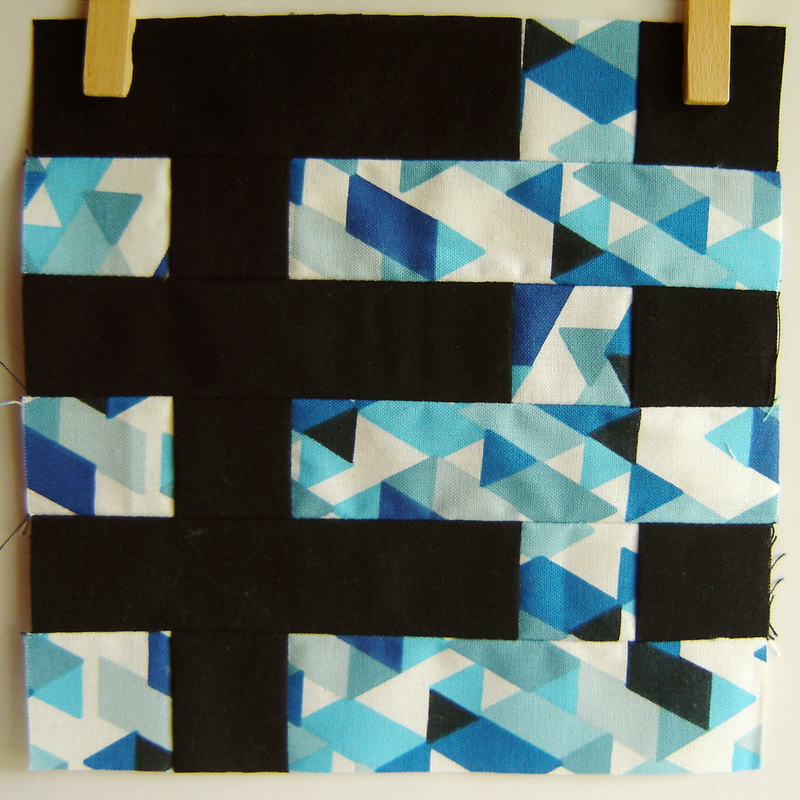
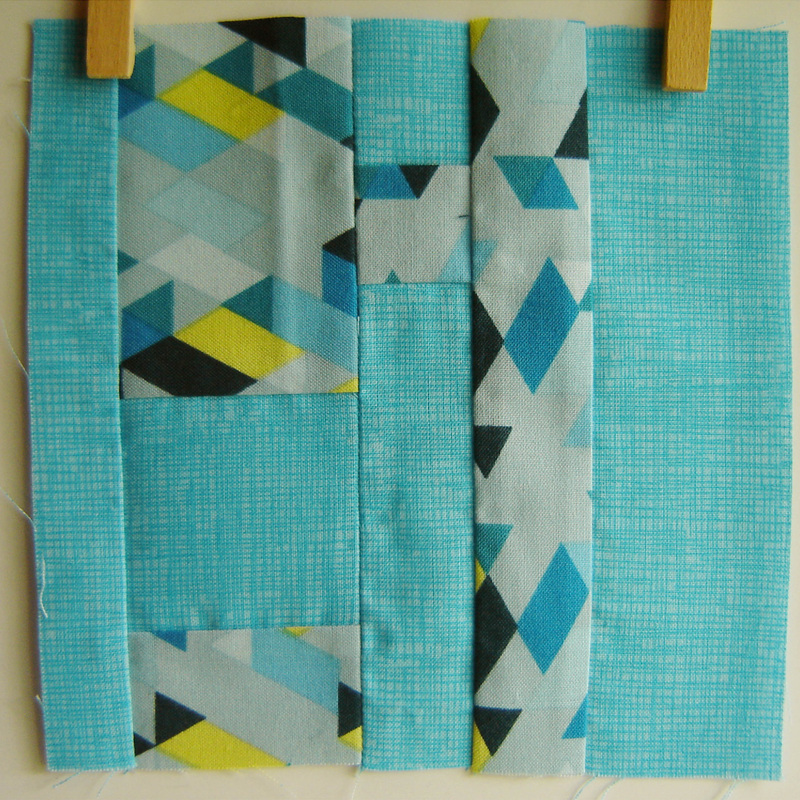
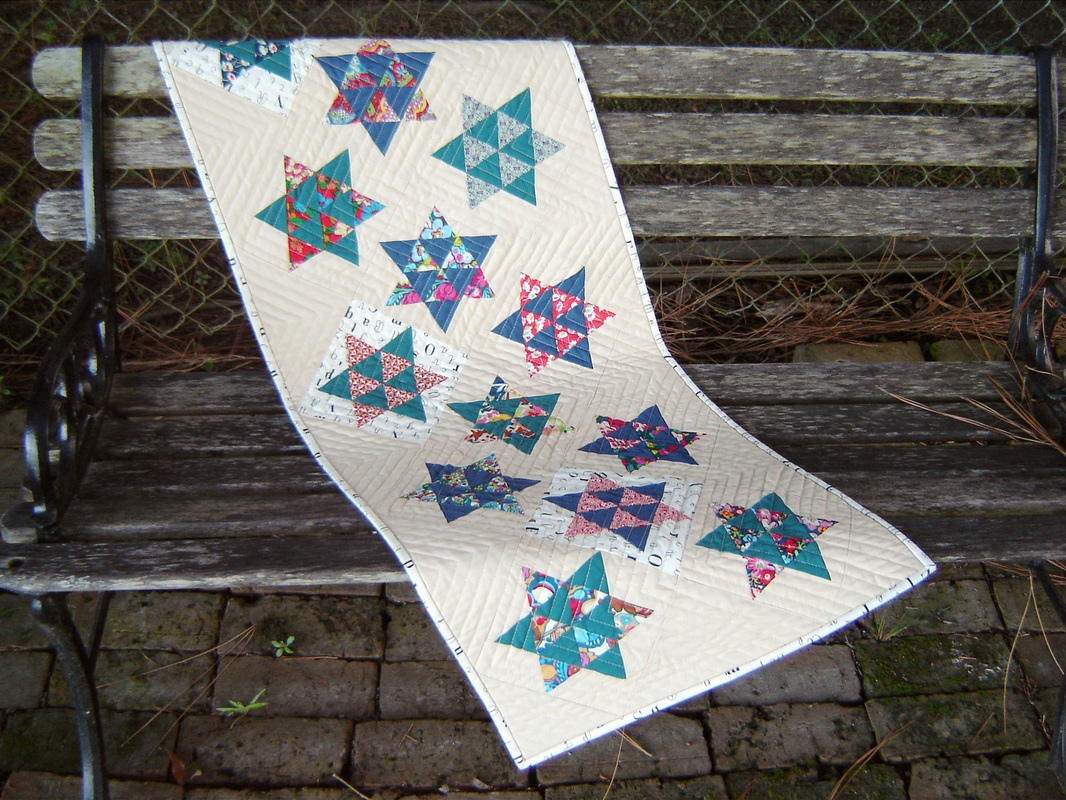
I don't know about you, but I'm sick of this wintery ice slush weather we have been having. I'm ready for Spring! Since I can't change the weather, I can change your mood! Looking through old blog posts and my photographs, I realized I never showed off the finished Bloom Bloom Pow quilt top. So here she is! Almost exclusively Denyse Schmidt and matching solids, this top measures 57" x 67" and will be a great lap quilt. 
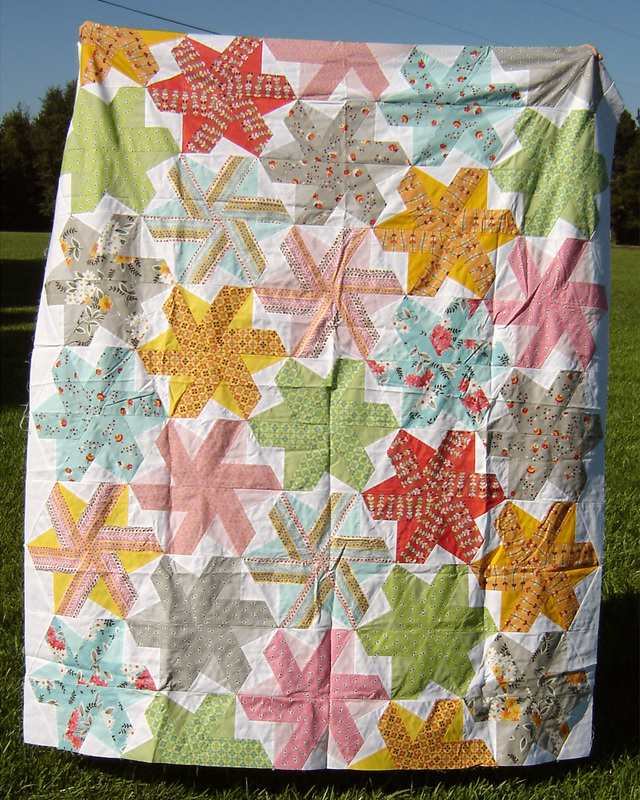
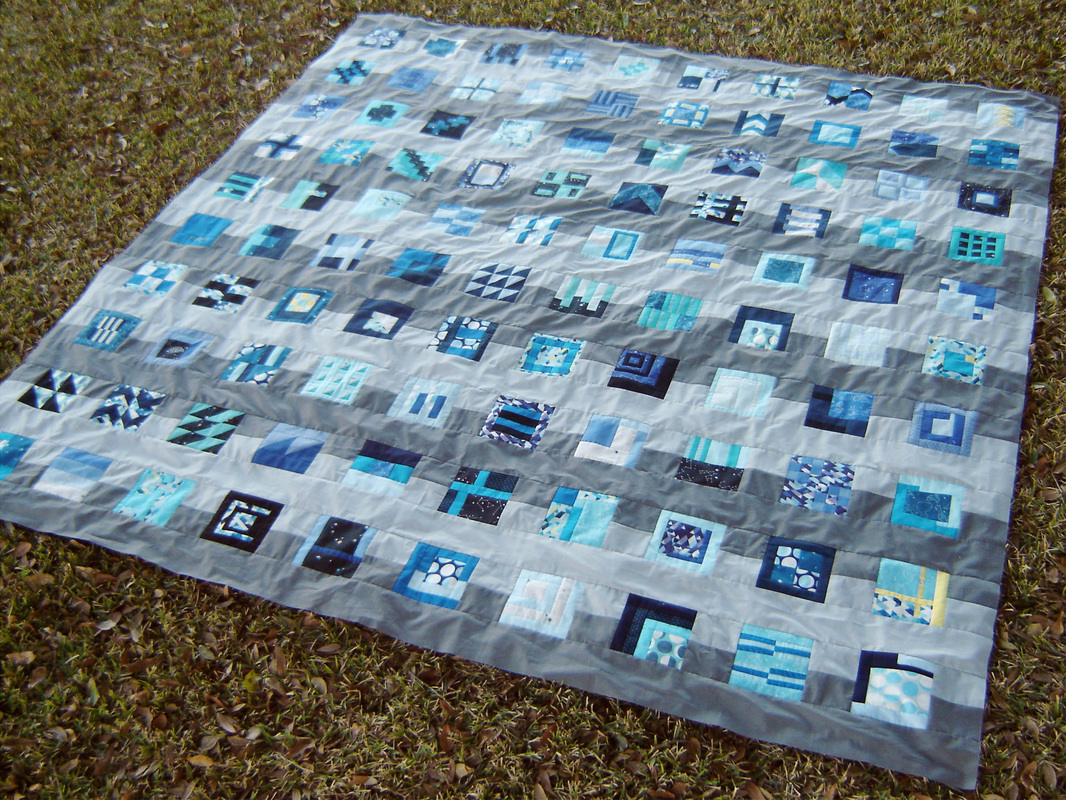
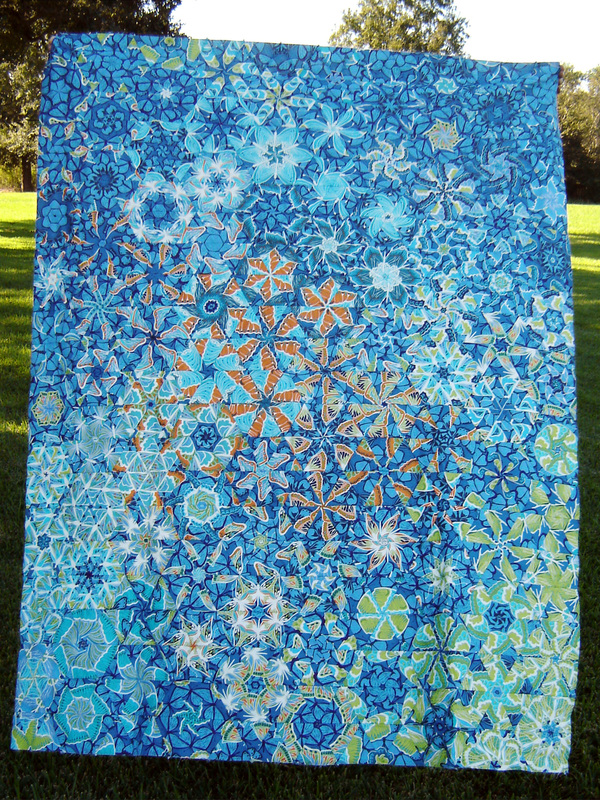
Here is the wrinkly quilt top photo, in full sun. The only reason I include this picture is because the colors are the most true in this photo. So bright and sunny, I do love this quilt! Now I just have to figure out how to quilt her! Feel free to share any ideas you might have, I would greatly appreciate it! 
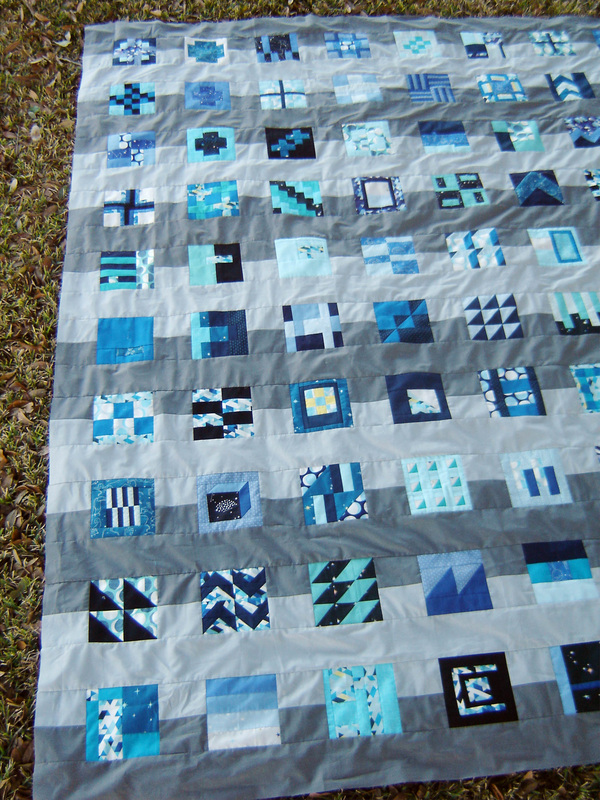
Interested in making your own? This quilt was part of a fun quilt along hosted by Lee of Freshly Pieced. You can find all the details HERE.
5 Comments
As of January 1st, I had officially finished 70 of the 100 City Sampler blocks from the book, 100 Modern Quilt Blocks by Tula Pink. Knowing that I had worked on these blocks in spurts for at least six months, I knew I wanted to finish them all and get the quilt top done! Finishing blocks 70-100 took about 3 days total. I picked out all the fabrics, cut everything out and then chained stitched like crazy! Now I had all 100 blocks complete. Yeah!!! All along I knew that I would be making the "City Planner" quilt layout that is included in the book, so I had to decide on the sashing solids. Why didn't I order these fabrics months ago? Who knows, that would have made so much more sense. So I got in touch with Hawthorne Threads, and the lovely Becky helped me with picking two gray fabrics that complimented each other and complimented the blocks, which were constructed out of the line Constellations by Lizzy House and a variety of blue solids. I ended up deciding on two solid (Silver and Charcoal) fabrics from Hawthorne Threads new line called Hawthorne Hues. They were perfect, and have such a beautiful hand to them, it really was a dream to work with these new solids. Oh and I bought these fabrics, so I'm totally not biased or anything, they really are nice. They ironed really well too. Just saying. Now it was time for construction. The City Planner layout uses all 100 blocks and makes a king size quilt. Oh my, what have I gotten myself into? So I started cutting, and sewing, and laying out blocks, and sewing some more. Goodness gracious! I included the below shot to show what it looked like when I was laying the blocks out on my living room floor. I started with the layout that Tula used in the book, then had to move around blocks according to the same fabrics or solids being next to one another. By the end I moved a lot of them, but the original layout concept is still there. Once I had finished all the rows, then it was time to add the sashing in between. I don't think I have ever sewn 104" seams before and needless to say it took way longer than I ever thought it would. It grew and grew and got big and heavy, oh my. Here it is, in all its finished glory! I will start with saying that I have been working on this steady for two weeks now, and everything in the world has been trying to stop me from finishing it. Originally my husband was going to keep the kids one weekend so I could finish, then that fell through. Then we had the crazy snow storm here in the South, and in total the kids missed four days of school. Talk about a freak occurrence, and then of course I had to go and get sick, like fever, all the cold symptoms...yuck. Needless to say that DayQuil has been my best friend as of late and the only reason this quilt was actually finished in time tolink up with the Sew Along over at Sew Sweetness. I also want to apologize for the poor quality of these photos, this quilt is really too big for me to wrestle by myself, and be it that I was working in a fevered stupor today, this was the best I could do. Laying it on the dry spot in the yard. Standing on my step stool, tip toeing, the photo below almost shows the whole thing, which measures 104" x 104." Though the colors look a bit dull in the photos, in real life it really is pretty, be it that the Constellations fabric line technically has no gray in it, the blocks really stand out from the background. All those shades of blue, both warm and cool, all in one harmonious mixture. There is a touch of yellow throughout, and bits of black and white and all those constellations and stars. This quilt is for my husband, using his favorite colors and will be for our bed. At one point he was helping me adjust a row (he isn't aware this quilt is for him) and said, "I really like this one, did you know it is my favorite color combinations of blues and black." I chuckled inside, because yes, I did know that. Now the test will be to see if he reads my blog! HA! At this moment, I do plan to quilt this one myself. I just ordered king size batting, and I bought 108" wide backing fabric (3 yards) so I wouldn't have to piece the back. I think I may try spray basting on this one, because the idea of pin basting it makes me want to cry. You can see my little "helper" below, who desperately wanted to be included in the photo shoot and didn't understand why I wouldn't lay down on it and let him take a photo of me, on the quilt. Nope, not today. Maybe when it is finished. Thanks to all who sponsored the quilt along, and a super big thanks to Tula Pink, who wrote an awesome book that didn't have any mistakes (or at least none that I found,) which is pretty impressive for a book based on measurements and numbers! It was a fun 8 months, I loved seeing all the other entries and all of the blocks posted to Flickr. Though the quilt along is over, you can make the blocks at any point, trust me, they really are rewarding and fun! Well I think it is time for another dose of medicine (NyQuil this time,) so I will sign out for now!
P.S. I titled this post "Labor of Love" because just like when you first have a baby, you think, why would I ever do that again? Then time passes, you forget about all that hard work and you have another. Thus, this is how I feel with this huge quilt. I am hoping in time I forget how hard it was to wrestle this beast and will make another large quilt! But for now, nope won't be making another king size quilt anytime soon! This is a first for me y'all. I made these blocks this morning, picked fabrics, cut them out, sewed them together, ironed them, took pictures and blogged about them all in one day, or better yet, one morning! I think in the three or so years I have been blogging, I have never done that, shared a project the same day it was made. So woohoo for me....I guess, or maybe that is just pathetic. Oh well. Anyways I'm rambling.... Here are my week three blocks in the Quilty Fun Sew Along. Two simple super scrappy Courthouse Step blocks. No wonder I could get it all done in one morning, these blocks are SO EASY and fun, I love log cabin blocks. You can see all three weeks worth of blocks below. So scrappy and pretty, this is going to be a cool quilt. Oh and before I forget, thanks everyone for the well wishes last week, I am slowly feeling better and happy to say that I do believe I am on the mend! Want more information? Interested in sewing-along?
Book: Quilty Fun by Lori Holt Sew Along and Blog Tour Details: Fat Quarter Shop Flickr Group: http://www.flickr.com/groups/quiltyfunsewalong/ Week Three - Courthouse Steps: ps i quilt I've been sick this week and it seems like every time I am sick, I just lay around and dream up new projects. I guess because I can't really work on current ones, it is easy to dream and read online and then before you know it, order a book, some fabric and now that dream project is a reality. Then you find yourself on the floor surrounded by a pile of used Kleenex and mounds and mounds of fabric scraps. After pulling out an insane amount of fabrics, you then stare at them forever and try to decide which ones don't belong. So you edit and edit and then you have a neat little stack of color sorted fabrics that at least in your mind match and look nice together. The fabrics sit there for a day or two, so you add some of the edited ones back in, take them back out, back and forth until you say, "Enough!" You then have to take pictures of all these pretty little mounds of fabric. Everyone does that right? You wait patiently for that book and fabric you ordered earlier in the week to arrive. Thankfully I ordered from The Fat Quarter Shop, so I didn't have to wait long. If I order something from them on Monday, I have it in my hot little hands by Wednesday, so that is pretty awesome. The book arrives and you devour it within the first hour and then realize you will actually have to get your sick butt off the couch if you actually want to get started. The two prints below are the ones I ordered, 50% off (AWESOME) and will be the two outer borders on the finished quilt. Love those two little love birds on the red print. Now I have to decide what fabrics to use for the first block, but since I already have such neat little stacks, the decision is pretty easy. Cutting took about 30 minutes, and then after about 1.5 hours of piecing, I end up with these super cute apples. Eek...love them! Then I move on to the next block, these ninja looking stars. Also quick to cut out, a little more time consuming as far as piecing, but only because my machine tends to chew up the little pieces. Then I am finished and officially "caught up" in this sew along! But alas, still sick. So maybe I'll go dream up another new project... or maybe I should just sleep. Want more information? Interested in sewing-along?
Book: Quilty Fun by Lori Holt Sew Along and Blog Tour Details: Fat Quarter Shop Flickr Group: http://www.flickr.com/groups/quiltyfunsewalong/ Week One - Apples: Very Kerry Berry Week Two - Twinkly Winter Stars: nanaCompany It all started with a single cut of fabric, 5 yards to be exact. It was cut, lined up, cut up some more and then pieced together. A whole lot of 60 degree triangles, actually 684 triangles. Stitched into 114 hexagon blocks. They were then stuck onto a design wall, admired for a bit, then sewn into rows, 22 rows. Then those 22 rows were sewn together, and TA DA! I have a quilt top, one I am so happy with! My mom helped me take photos this weekend. The wind was blowing, thus the "action shots," but you get the idea. I oriented the quilt this way on purpose. I imagine the top is the sky, slowly fading into the colors of the land, since the bottom half is more color heavy. I love how you can't really see butterflies and only color and some really great movement. The top measures 53" x 67," much bigger than I originally anticipated, but with a pattern like this you don't really know what your finished size will be, it all depends on how many of those hexagon blocks that you use. I was able to use all of them, yep all 114. It just worked out right, easily too, they just fell into place and the math just worked out. I was pleasantly pleased not to have any left overs and I get to admire every single block that I created. The photo above is REALLY what the quilt looks like, in full sun, wrinkles and all. BUT, it really shows the TRUE colors the best, thus this is why I included the photo in the post. The colors are really rich and vibrant. So pretty. The other photos were taken in the shade, which explains the fact that the wrinkles just fade away and it looks perfectly flat and awesome, but the colors are just ever so dull compared to the photo above. Just being honest! I had to include the back shot. Just look at all those seams, all those triangles. It looks really neat like this. It isn't that neat in real life, but it sure looks it here. I love it! This quilt top is my entry into the One Block Wonder Quilt Along hosted by Jen at Quilter in the Closet. Thank you Jen for introducing me to such a cool technique and hosting such a great quilt along!
Last quarter of the year! WHAT? I'm doing it up HUGE! My list is huge, my goals are huge and going to try so hard to get these projects done! Oh and please excuse some of the poor quality photos, they are works in progress and the photos were taken in substandard conditions! HA! Here is my list in order of how I would like/need to get them finished: 1. Emerald Cut Quilt - This one has been quilted and the binding is sewn on, I just need to hand sew the binding closed. I almost finished this one for the third quarter, but didn't quite make it. Will wrap this one up soon. 2. Solar System Quilt - I put this panel quilt together early last month and basted it. I plan to hand quilt this one with pearl cotton. This one is a Christmas present, so I need to get cracking! 3. One Block Wonder Quilt - Here it is on the design wall. Since this shot, I have sewn it into rows, and it now awaits me to sew the rows together. Once the rows are together I will add a border or two. Then I just have to baste and quilt. 4. Open Wide Zipper Pouches - Early last month I whipped up these patchwork panels and plan to turn them into two Open Wide Zippered Pouches (pattern by Noodlehead.) These need to be finished before Christmas also! 5. Modified Rebecca Bag - My mom has requested a purse after seeing my Rebecca Bag that I made for Craft Book Month. It is cut out and awaiting me to buy a zipper and then whip it up! 6. Mango Quilt Block - Plan to turn this into a mini quilt of some sort. Interested in making your own? Find the tutorial over at A Quilter's Table HERE. 7. Dogwood Blossom Quilt - I think I have 12 of the 20 blocks finished. Eight more blocks then piece the top into a twin sized quilt. I also have to figure out the backing of this one. 8. Christmas Strings Quilt - I actually hope to work on this one during the holidays, I just can't seem to get motivated to work on a Christmas Quilt during other points in the year. I have a good idea of how I want to piece this quilt top and am excited to work on it in December. This will be a lap quilt. 9. Latticework Quilt - I took the time to baste this one about a month ago. It sits waiting for me to quilt it! 10. Sister's Ten Quilt - I have been following along with this year long quilt along, but just haven't shown off many of the blocks. I have 6 more blocks to construct (fabric is already cut) and then to assemble the quilt top! I think this one will be king sized, so I may have to send it off to be quilted. 11. Autumn Sampler Cross Stitch - Started this one kinda randomly last week, wanting an evening and car ride project. I am almost finished with this one block, only 24 more to go! Since we don't have much "fall" in Louisiana, I don't mind working on this through the winter, the temps will finally be fall like then! 12. City Sampler Quilt - Why not go crazy and say that I will finish up my City Sampler Quilt! I have roughly 30 blocks left to make and then to assemble the top, and of course quilt it. The odds of this, the last project on my list getting done is pretty crazy, but hey why not dream big! There it was, my big crazy 12 project list. Honestly, if I get around 5 done, I'll be happy with that. This will be the last to-do list of the year, and I have to thank Leanne for hosting the Finish-A-Long this year and motivating so many of us to get those projects finished!
Happily leaving the "triangles" chapter behind and moving onto "stripes." Much easier, much more enjoyable. These are the blocks for last week and this week. I really like block #59, don't really like block #60. There is probably one in every bunch that I like a lot, and one that I don't, I'm sure just the nature of the beast. Running low on the blue solids for this quilt, so it will be time to do some shopping soon! That is always fun! Have a good weekend folks! Wondering what all of this is about? Here are the details:
Book: City Sampler 100 Modern Quilt Blocks by Tula Pink Quilt Along: Hosted by Sara over at Sew Sweetness Flickr Group: http://www.flickr.com/groups/citysamplerquiltalong/ Blocks: 6.5" x 6.5" Featuring the fabric line Constellations by Lizzy House. A finish! Actually I have had this one done for a bit, just waiting on the opportunity to get decent photos of it and yesterday was the day! This table runner was started as part of the Dancing Stars Quilt Along hosted by Amy at Amy's Creative Side. All the fabrics were from my stash, the stars were part of a Liberty charm swap I participated in last year and the blue and green solids were scraps from my stash, and boy did I have just enough scraps to make the required amount of stars. All of the stars were paper pieced and I decided to have three of them with the text background, just for a bit of variety. I also used that same print for the binding, sorry I don't know what that print is, but I do love it. Once the top was put together, I basted it with pins, used a piece of scrap batting and I had a yard of another text print for the backing. Then I had to decide on how to quilt this one. There is sat for quite some time, which usually happens with me, I get stumped on the quilting process. Then it came to me, a chevron pattern! So using the block layout as the basis for the scale of the chevron, I started quilting the design 1" apart. I hated it. I kept going in hopes that it would grow on me, and it didn't. I felt like the spacing and where the lines fell on the blocks looked horrible and like a mistake. So now what? Rip it all out, live with it? Ughhh... After some consideration, and really not wanting to unpick all those stitches, I decided to go back and quilt in between each line, thus making the quilted lines 1/2" apart. Yeah! This did the trick, all those flaws seemed to disappear, the texture was great and the pattern was oh so much clearer. I was thrilled that it worked out and you can see the pattern plain as day on the back of this table runner, see below. The piece of fabric I used for the backing wasn't quite the right length, so I had to piece it, so technically there are two seams below, can you find them? I think the seams blend in so well, the print and the quilting just hide the seams so perfectly, you really have to look for them. I used my new favorite technique, machine stitched binding. Oh so fast and oh so neat and tidy. My corners turned out pretty well, or at least good enough for me and I didn't have to redo any parts of it. This technique works so well for me and if you are curious about the technique yourself, you can find out how, HERE. This project was on my Third Quarter Finish Along list (hosted by Leanne at She Can Quilt.) I am happy to say that I finished it and now it is ready to gift. The only problem is, whom to gift it to?
I am popping in today to share one of my "out of order" City Sampler blocks update. All of these feature triangles, and all were pretty straight forward. I didn't have any problems with these with the exception of number 45. If you look at that one, the top of my triangle isn't there, but I can live with it, it is one of those "good enough" blocks. I really like all the fabric choices for these, and it is amazing to me that even though I am not using any Tula Pink fabric, some of my blocks are pretty darn close to the ones in the book. Neat how that works out. For example, block number 46, pretty similar, or at least I think so. Well that is it for today, hopefully I will have some finishes to show you guys later this week! Wondering what all of this is about? Here are the details:
Book: City Sampler 100 Modern Quilt Blocks by Tula Pink Quilt Along: Hosted by Sara over at Sew Sweetness Flickr Group: http://www.flickr.com/groups/citysamplerquiltalong/ Blocks: 6.5" x 6.5" Featuring the fabric line Constellations by Lizzy House. Today is the official start of the One Block Wonder Quilt Along hosted by Quilter in the Closet. As you can see I got a little head start (I was too excited to wait!) This quilt along is based on one of three books by Maxine Rosenthal. You could purchase any of the three, so I decided to get the first one, One-Block Wonders - One Fabric, One Shape, One-of-a-Kind Quilts. This book covers all the basics of how to make a One Block Wonder quilt, thus I was able to get a head start. The book covers fabric selection, how to cut, sew, arrange and put together your quilt, all from one fabric, and just one block shape, though you do have the option to either make a hexagon or an octagon shaped block. I am going the hexagon route, especially since I already had a 60 degree triangle ruler. Be it that the official start of the quilt along is today, the host (Jen) has an interview with the book's author on her blog today, you can read that interview HERE. After quite a bit of deliberation, I chose this fabric (see above,) isn't it pretty? This fabric is by Valori Wells and is from her Cocoon line, this specific print is Liv in Sapphire, and since I am a September baby, I have always been partial to sapphires! The whole point of this type of quilt is based on your fabric choice, so you need to pick a large scale print that ideally has a 24" repeat. This one has a 24.5" repeat and the smallest foreground butterflies are in the 4" range. It also helps to pick a print that doesn't have too many colors. I felt this print was just right, and I love not only the print, but the colors, so I know I will love the finished quilt! This past weekend I took the time to precisely cut out the fabric, there is a specific way that Maxine teaches in the book of how to perfectly line up and cut your fabric, which was actually easier than I thought it would be. The fabric strip above is 6 layers stacked on top of each other and the print is perfectly lined up on top of one another. You can also see my brand new Olfa Splash Rotary Cutter, which I love. It really helped to have a brand new blade, especially since I was slicing through 6 layers of fabric. After the strips are cut, you then cut out the 60 degree triangles. I was able to cut out 19 triangles from each strip, thus making 19 blocks from each strip. I cut six strips, so by my calculations I should be able to make 114 blocks. After everything was cut I couldn't help myself and laid out the first five blocks! Eek....so cool! Look how they are transformed. I am beyond excited by this one, can't you tell! Since I had these five laid out, I HAD TO sew them together. So here are three of the five sewn top and bottom rows only, they are just pinned together in the middle, so there aren't any frustrating Y seams, you sew this quilt together in rows. I stopped at this point because I had to finish up some other WIPs, but as soon as I've wrapped up a few things, I will be working on this one, full force! Fancy to join along? Go check out the details, there is plenty of time to join in!
|
Marci GirlA feisty mom designing, sewing and blogging her way through everyday life!
|